This guide assumes you already have and are using the following programs:
____________________________________________________________________________________________________
Software Setup and Configuration Guide - This article will show you how to install and configure the software mentioned above.
_______________________________________________________________________________________________
BluRay/HDDVD/HDTV
Basic Script
1. Open AvsPMod and copy and paste in this script and save it. Open a new avs file and paste this in it:
2. Save that script as source.avs for example, it will be used for the next script.
3. Hit F5 and AvsP will appear to freeze. This is normal while FFVideoSource is indexing the video. After indexing, you will see duplicate frames in the preview pane. Even numbered frames are from the source and the following odd numbered frames are from the encode. Navigate to the frames you wish to take screenshots of and right click in the preview pane to save your images as PNGs.
Result
Source

Encode
Source, Encode: Show comparison
DVD/VHS
1. Open DGIndex, Add the main feature DVD sequence (Screenshot). Click File -> Save Project. You need the resulting .d2v file for the next script.
2. Open AvsPMod and copy and paste in this script and save it. Open a new avs file and paste this in it:
3. Save that script, it will be used for the next script. Save it as dvdsource.avs for example.
Important note: ffinfo can not detect frame types of DVDs correctly, which is why they are not displayed in this script. The info=1 part shows the real frame type, but it shows too much text over the screenshot (example), that's why you might want to disable or enable it.
4. Hit F5 and AvsP will appear to freeze. This is normal while FFVideoSource is indexing the video. After indexing, you will see duplicate frames in the preview pane. Even numbered frames are from the source and the following odd numbered frames are from the encode. Navigate to the frames you wish to take screenshots of and right click in the preview pane to save your images as PNG. When saving comparison screens for upload, ensure you limit the source Picture Type to B or P and encode to B; never use I for either.
Result:
Source, Encode: Show comparison
Other
Common Errors
Plugins won't load
Add these lines to the top of your script, pointing towards FFMS2.avsi and ffms2.dll in your directory respectively:
Source and Encode are off by one frame
Handbrake sometimes drops the first frame so the resulting encode may be one frame shorter. To realign it with the source again, append .trim(1,framecount) at the end of the source import line, e.g.
Encode has a different frame rate than Source
put
Change the frame rate accordingly to whatever different frame rate you are facing. AvsPMod will present you options.
Test Encodes
The script can be altered to be a very powerful tool when comparing screenshots from several different test encodes to the source.
You can see we've input the source and three test encodes with varying CRF values, labeled them accordingly with Subtitle, and interleaved them in a way that allows a forward progressing comparison to the source...
Result: Show
Source, Test 1, Source, Test 2: Show comparison
Moving Text Position
You can move the position of your text you add ("Source", "Encode", "[Encoding Group]", etc.) by editing the align factor.
With align=1 until align=9 define the positioning at corners or at the middle.
With y= or x= you move the text on the y or x axis respectively.
Use align=7, y=35 for example to display the text right under the frame type.
Adding Colors
Open ffms2.avsi and replace it with http://pastebin.com/zhm8RdwS.
Now you can edit your script to display your text with colors.
Source, Encode: Show comparison
____________________________________________________________________________________________________
Software Setup and Configuration Guide - This article will show you how to install and configure the software mentioned above.
_______________________________________________________________________________________________
BluRay/HDDVD/HDTV
Basic Script
1. Open AvsPMod and copy and paste in this script and save it. Open a new avs file and paste this in it:
FFVideosource("C:\Path\to\Remux.mkv") #Replace with the path of the source

Crop(2, 2, -2, -2) #use the cropping values you used for the encode - crop(left, up, -right, -down)

Spline36Resize(1024,556) #final width and height of the encode
2. Save that script as source.avs for example, it will be used for the next script.
# path to the avisynth script used to make the encode

a=import("C:\Path\To\source.avs").subtitle("Source", align=9).ffinfo(framenum=true,frametype=true,cfrtime=false,vfrtime=false,version=false,cropping=false,colorrange=false,colorspace=false,sar=false)

# path to the encode

b=ffvideosource("C:\Path\To\encode.mkv").subtitle("Encode", align=9).ffinfo(framenum=true,frametype=true,cfrtime=false,vfrtime=false,version=false,cropping=false,colorrange=false,colorspace=false,sar=false)

interleave(a,b)
3. Hit F5 and AvsP will appear to freeze. This is normal while FFVideoSource is indexing the video. After indexing, you will see duplicate frames in the preview pane. Even numbered frames are from the source and the following odd numbered frames are from the encode. Navigate to the frames you wish to take screenshots of and right click in the preview pane to save your images as PNGs.
Result
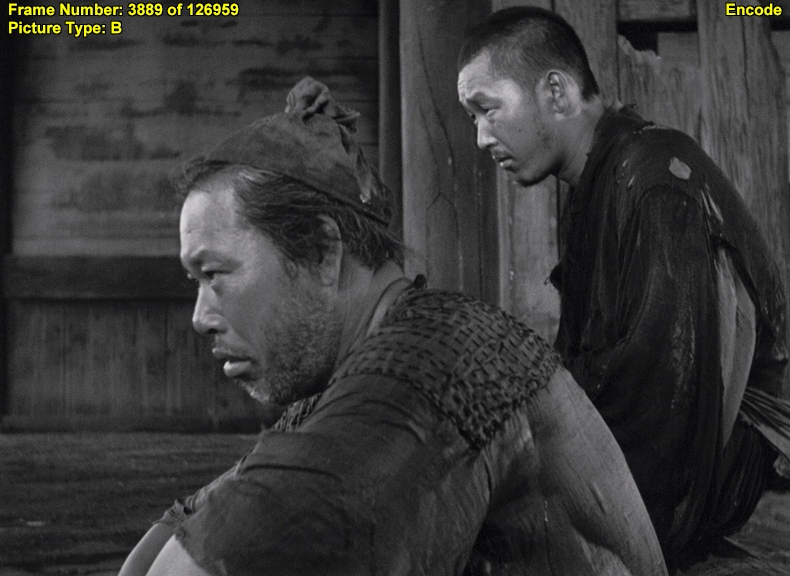
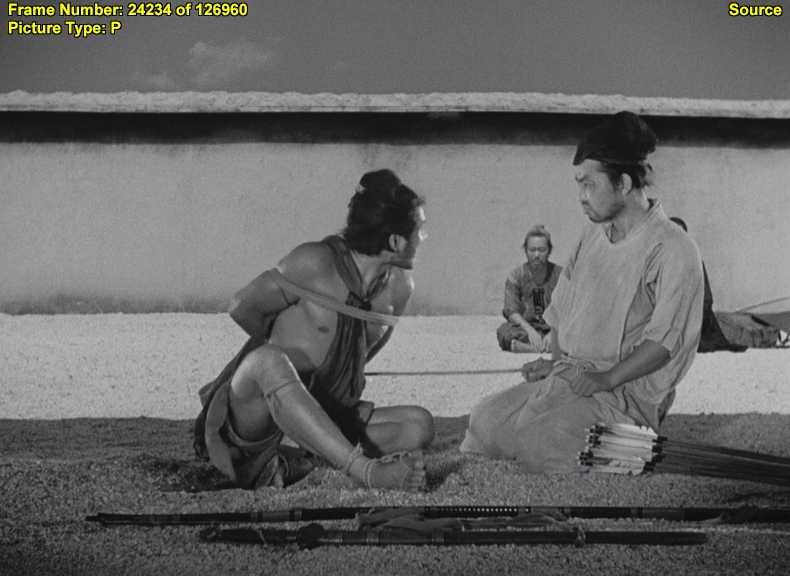
Source
Encode
Source, Encode: Show comparison
[comparison=Source, Encode]https://i.ibb.co/0fRP8sp/456qri.png https://i.ibb.co/ZGRbRrM/x66s98.png[/comparison]DVD/VHS
1. Open DGIndex, Add the main feature DVD sequence (Screenshot). Click File -> Save Project. You need the resulting .d2v file for the next script.
2. Open AvsPMod and copy and paste in this script and save it. Open a new avs file and paste this in it:
Mpeg2Source("C:\Path\to\dgindex.d2v", info=0) #info=0 or info=1 turns off or on the frame information overlay
Crop(2, 2, -2, -2) #use the cropping values you used for the encode - crop(left, up, -right, -down)
3. Save that script, it will be used for the next script. Save it as dvdsource.avs for example.
a=import("C:\Path\To\dvdsource.avs").subtitle("Source", align=9)

b=ffvideosource("C:\Path\To\encode.mkv").subtitle("Encode", align=9)

a=a.ffinfo(framenum=true,frametype=false,cfrtime=false,vfrtime=false,version=false,cropping=false,colorrange=false,colorspace=false,sar=false)

b=b.ffinfo(framenum=true,frametype=true,cfrtime=false,vfrtime=false,version=false,cropping=false,colorrange=false,colorspace=false,sar=false)

interleave(a,b)

spline36resize(converttorgb,ffsar>1?round(width*ffsar):width,ffsar<1?round(height/ffsar):height)
Important note: ffinfo can not detect frame types of DVDs correctly, which is why they are not displayed in this script. The info=1 part shows the real frame type, but it shows too much text over the screenshot (example), that's why you might want to disable or enable it.
4. Hit F5 and AvsP will appear to freeze. This is normal while FFVideoSource is indexing the video. After indexing, you will see duplicate frames in the preview pane. Even numbered frames are from the source and the following odd numbered frames are from the encode. Navigate to the frames you wish to take screenshots of and right click in the preview pane to save your images as PNG. When saving comparison screens for upload, ensure you limit the source Picture Type to B or P and encode to B; never use I for either.
Result:
Source, Encode: Show comparison
Other
Common Errors
Plugins won't load
Add these lines to the top of your script, pointing towards FFMS2.avsi and ffms2.dll in your directory respectively:
import("C:\Program Files\AviSynth\plugins64\FFMS2.avsi")
LoadPlugin("C:\Program Files\AviSynth\plugins64\ffms2.dll")
Source and Encode are off by one frame
Handbrake sometimes drops the first frame so the resulting encode may be one frame shorter. To realign it with the source again, append .trim(1,framecount) at the end of the source import line, e.g.
a=import("C:\Path\To\source.avs").subtitle("Source", align=9).trim(1,framecount)Encode has a different frame rate than Source
put
ChangeFPS("ntsc_film") in your source.avs or a=a.ChangeFPS("ntsc_film") in the main avs file.Change the frame rate accordingly to whatever different frame rate you are facing. AvsPMod will present you options.
Test Encodes
The script can be altered to be a very powerful tool when comparing screenshots from several different test encodes to the source.
You can see we've input the source and three test encodes with varying CRF values, labeled them accordingly with Subtitle, and interleaved them in a way that allows a forward progressing comparison to the source...
a=import("C:\Path\To\source.avs").subtitle("Source", align=9)

b=ffvideosource("C:\Path\To\test1.mkv").subtitle("Test Encode 1 CRF 18", align=9)

c=ffvideosource("C:\Path\To\test2.mkv").subtitle("Test Encode 2 CRF 17", align=9)

d=ffvideosource("C:\Path\To\test3.mkv").subtitle("Test Encode 3 CRF 16", align=9)

interleave(a,b,a,c,a,d)

spline36resize(converttorgb,ffsar>1?round(width*ffsar):width,ffsar<1?round(height/ffsar):height)

ffinfo(framenum=true,frametype=true,cfrtime=false,vfrtime=false)Result: Show
Source
Test Encode 1 CRF 17
Source again
Test Encode 2 CRF 16
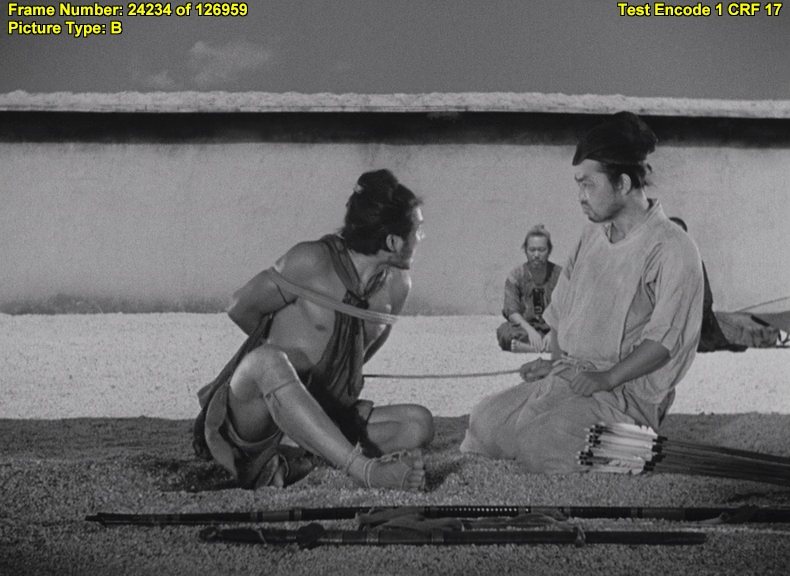
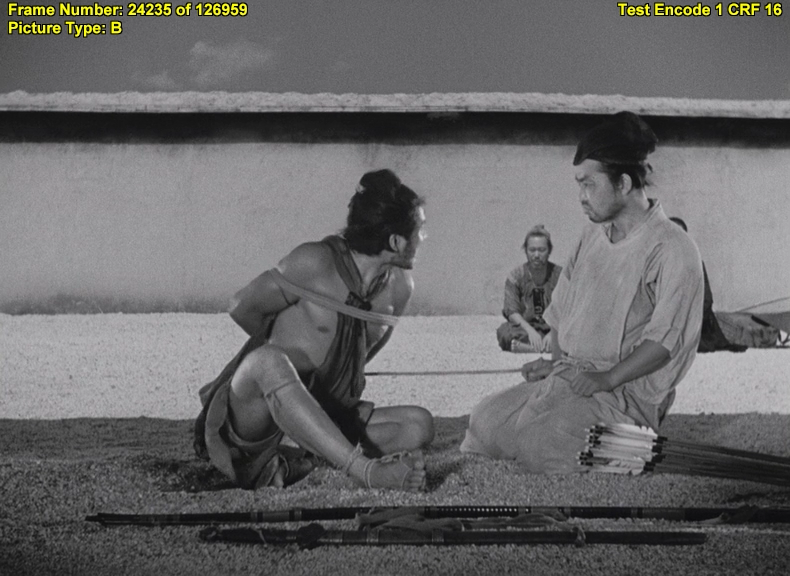
Source, Test 1, Source, Test 2: Show comparison
Moving Text Position
You can move the position of your text you add ("Source", "Encode", "[Encoding Group]", etc.) by editing the align factor.
With align=1 until align=9 define the positioning at corners or at the middle.
With y= or x= you move the text on the y or x axis respectively.
Use align=7, y=35 for example to display the text right under the frame type.
Adding Colors
Open ffms2.avsi and replace it with http://pastebin.com/zhm8RdwS.
Now you can edit your script to display your text with colors.
a=import("path\to\source.avs").subtitle("Source", align=9)

b=FFVideoSource("path\to\encode.mkv").subtitle("Encode",text_color=$cccccc,halo_color=$0b5394,align=9)


a=a.ffinfo(framenum=true,frametype=true,cfrtime=false,vfrtime=false)

b=b.ffinfo(framenum=true,frametype=true,cfrtime=false,vfrtime=false,text_color=$0b5394,halo_color=$cccccc)


interleave(a,b)
Source, Encode: Show comparison